


These indoor cannabis cultivation tips cover the pre-harvest practices that decide how evenly flower dries and how cleanly it trims.
Best Manufacturing Practices for the Cannabis Industry · Softrim Starter Guide Series
Purpose of These Indoor Cannabis Cultivation Tips
Cultivation ends when the plant is cut, and manufacturing begins at that same moment. Everything done before harvest therefore determines the raw material entering manufacturing, and that raw material decides how consistently flower dries and how well it trims, whether by machine or by hand.
Manufacturing only works when variables are limited to repeatable processes. The more consistent the raw material, the more repeatable the process, and the more repeatable the process, the more stable the output.
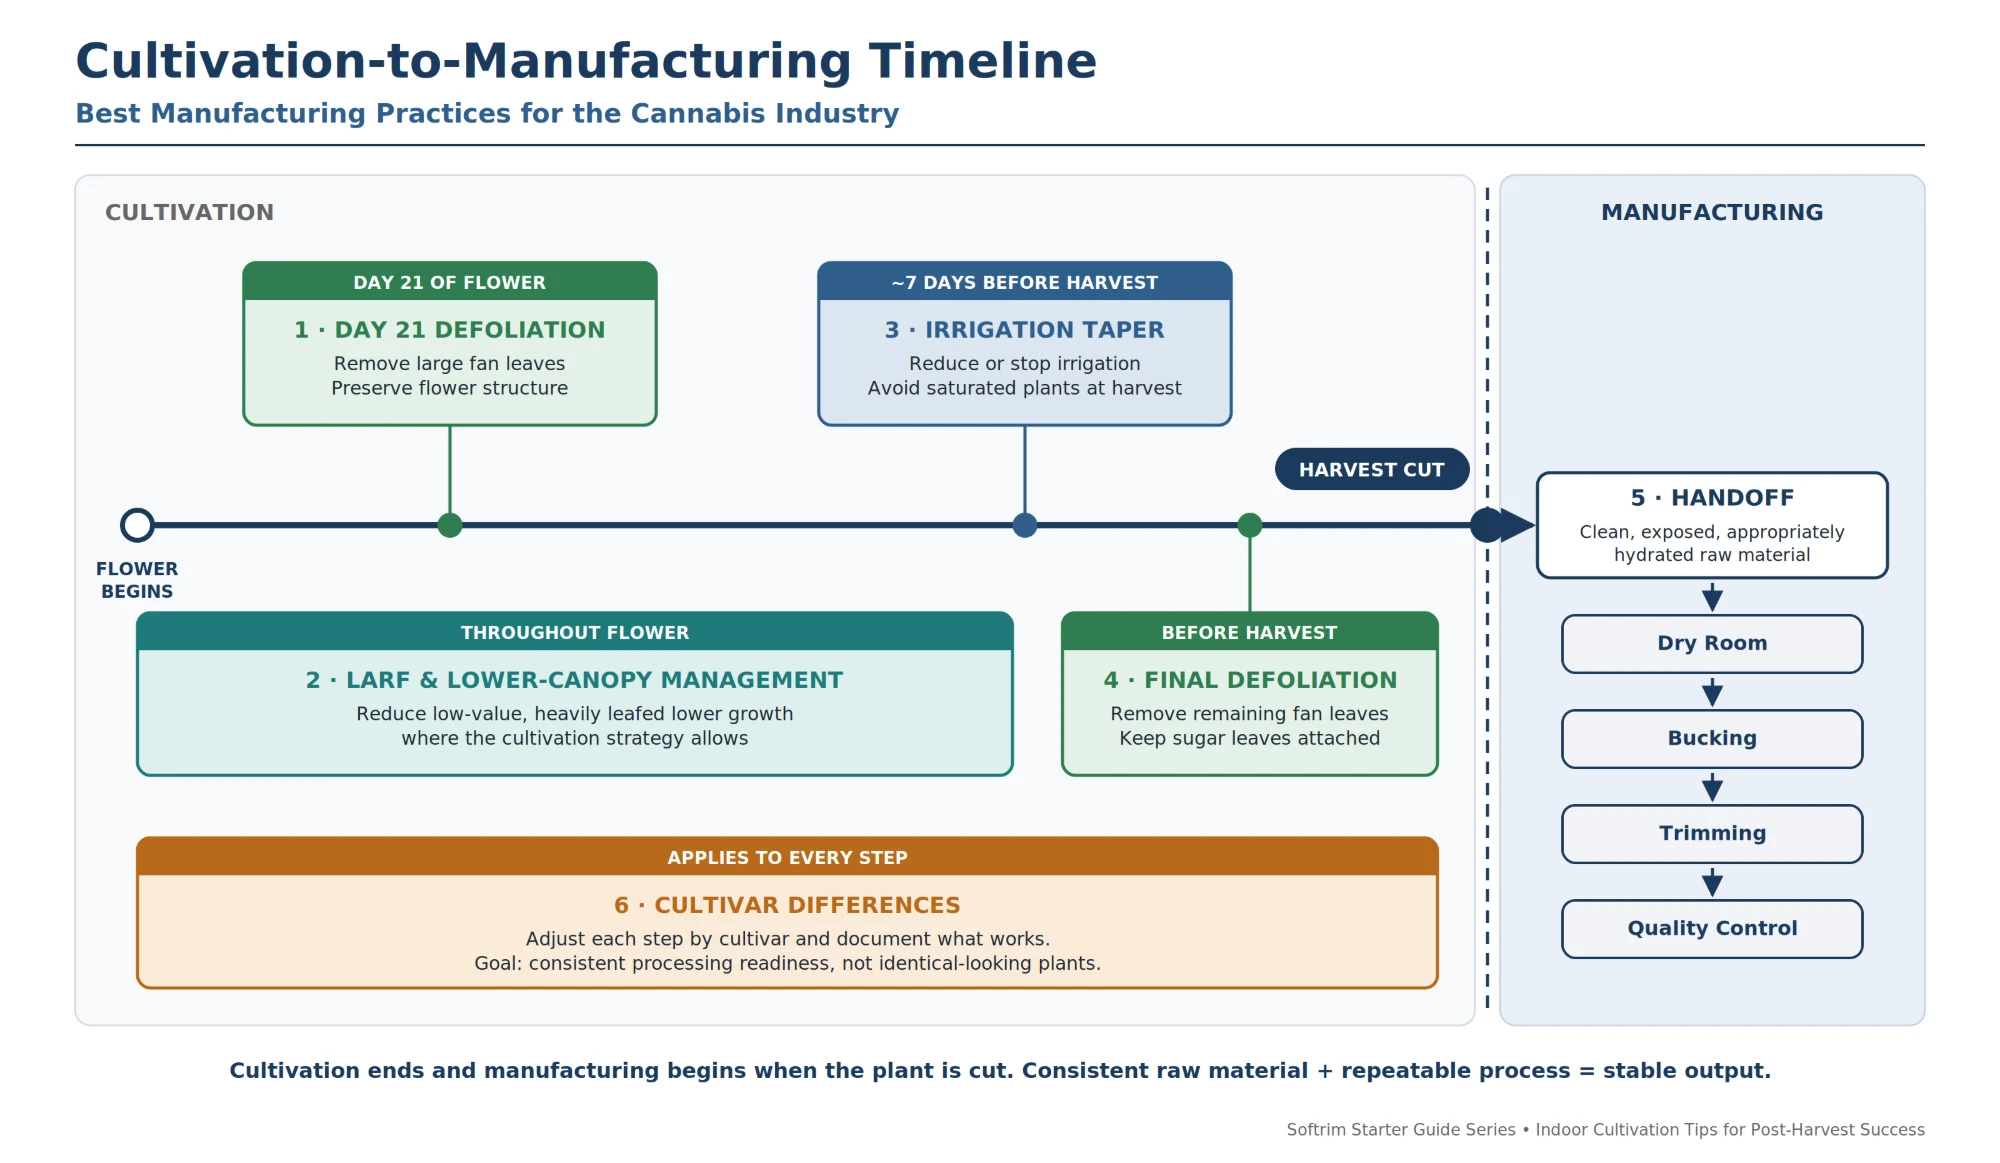
This guide covers the cultivation practices that most affect post-harvest manufacturing, in the order they happen. The timeline below shows when each one occurs, and the rest of the guide walks through it step by step. These are starting points: cultivar, substrate, irrigation strategy, labor, plant structure, and facility procedures should always be considered.
Quick Reference Guide
A road map of this guide, in the same order as the timeline. Review it before reading, then use it as a quick reference during flower and harvest planning. Click any topic to jump to that section.
| # | Topic | At a Glance |
|---|---|---|
| 1 | Day 21 Defoliation | Around Day 21 of flower, remove large fan leaves and unnecessary foliage. Preserve flower structure. |
| 2 | Larf & Lower-Canopy Management | Throughout flower, reduce low-value, heavily leafed lower growth where the strategy allows. |
| 3 | Irrigation Taper | Reduce or stop irrigation about 7 days before harvest. Avoid saturated plants, but do not drought aggressively. |
| 4 | Final Pre-Harvest Defoliation | Remove remaining large fan leaves so flower is visible. Keep sugar leaves attached. |
| 5 | Handoff to Manufacturing | At the harvest cut, deliver clean, exposed, appropriately hydrated raw material. |
| 6 | Cultivar Differences | Adjust every step by cultivar and document what works. |
The cultivation formula: less unnecessary foliage + managed larf + appropriate hydration at harvest = consistent raw material for manufacturing.
Walking Through the Timeline
Each step below follows the timeline from the start of flower to the harvest cut.
1. Day 21 Defoliation
Best practice: A significant defoliation around Day 21 of flower is common across indoor cultivation and is recommended where it fits the facility’s cultivation strategy. Focus on removing larger fan leaves and unnecessary foliage while preserving the desired flower structure.
Why it matters: Large fan leaves add vegetative mass and moisture that must later be managed during drying, the first manufacturing step, and heavy foliage can cover developing flower and sugar leaves. Defoliating early improves exposure and airflow through the canopy, reduces the vegetative mass carried into harvest, and gives post-harvest a cleaner starting structure with less variability for the dry room to manage.
Key principle: Do not strip every cultivar identically. Plant architecture, leaf-to-flower ratio, and flower density should guide how much to remove.
2. Larf & Lower-Canopy Management
Best practice: Reduce unnecessary lower-canopy growth and excessive larf where the cultivation strategy allows.
Why it matters: Larf differs from primary flower in structure, density, leaf-to-bud ratio, and post-harvest behavior. Large amounts of it add work and variability at every manufacturing step: drying, bucking, trimming, sorting, and quality control. Managing it before harvest keeps the primary flower batch more uniform and reduces what must later be separated.
Key principle: The goal is not to eliminate every small flower site. It is to avoid carrying large amounts of low-value, heavily leafed lower growth into manufacturing, where it will need separate handling. For more, see Understanding Larf.
3. Irrigation Taper Leading Into Harvest
Best practice: Many commercial facilities reduce or discontinue irrigation approximately 7 days before harvest. Treat this as a starting point, and adjust timing to the substrate, irrigation system, cultivar, plant size, environment, and the facility’s cultivation strategy.
Why it matters: Water retained in the plant at harvest sets the moisture load entering the dry room, a raw-material variable that manufacturing must then manage. In field observations, facilities that kept irrigating heavily through the day before harvest saw noticeably more water retained in the harvested plant. When drying could not absorb that extra load, the batch ended the dry with more moisture variation:
Table 1. Signs of Excess Moisture at Harvest
| What You See in the Dry Room | What It Means for Manufacturing |
|---|---|
| Upper flower drying ahead of lower flower | Uneven batch; parts of the same plant are ready at different times |
| Leaf still pliable while flower looks close to ready | More conditioning required before trimming |
| Wide variation in Moisture Content or Water Activity | Less predictable processing and quality |
| Longer or more aggressive drying adjustments | More time and environmental intervention in the dry room |
Key principle: The objective is not to drought the plant as aggressively as possible. It is to avoid handing the dry room unnecessarily saturated plant material.
4. Final Pre-Harvest Defoliation
Best practice: Before harvest, evaluate the remaining fan leaf and, where labor and cultivation practices allow, remove larger fan leaves and unnecessary heavy foliage. Unlike Day 21 defoliation, this final cleanup varies significantly between growers and facilities.
Why it matters: Fan leaves covering flower and sugar leaves reduce their exposure to the drying environment. The flower can then approach the right moisture while the leaf that must be removed stays soft and pliable, which makes any trimming process less effective. Foliage removed before harvest is foliage manufacturing does not have to dry, condition, and remove later, and it helps flower and leaf reach trim readiness together.
What good looks like: Flower is clearly visible, not buried beneath large fan leaves, and sugar leaves remain attached for normal drying and trimming. A small amount of remaining fan leaf is fine; the goal is better exposure and less unnecessary mass, not complete stripping.
5. Harvest Cut: Handoff to Manufacturing
At the moment the plant is cut, cultivation hands manufacturing its raw material. That material should have:
- Major unnecessary fan leaves reduced, with flower and sugar leaves reasonably exposed.
- Excess lower-canopy growth and larf managed.
- Excess vegetative mass minimized.
- Plant hydration appropriate for the intended drying process.
- Cultivar-specific flower characteristics preserved.
- Material ready for harvest segmentation and dry-room preparation.
The plant does not need to be completely stripped or standardized. The goal is the cleanest and most manageable starting condition practical for that cultivar and operation.
Supporting Practices
6. Adjust for Cultivar Differences
Differences in flower architecture, density, leaf-to-flower ratio, internodal spacing, sugar-leaf structure, and overall plant morphology change how flower dries and trims. Use the steps above as a baseline, then adjust by how each cultivar behaves through drying and processing. In manufacturing terms, each cultivar is a different input: documenting what works for each one turns its preparation into a repeatable, cultivar-specific procedure.
The desired result is consistent processing readiness, not identical-looking plants.
Cultivation Checklist
| Do | Avoid |
|---|---|
|
|
Key Takeaway
Post-harvest success begins before the plant enters the dry room. Good cultivation preparation does not replace a controlled drying procedure, but it gives the dry room the best chance to produce moist flower surrounded by dry, brittle leaf that trims consistently.
Consistent raw material + repeatable process = stable output.
Next Step: Dry Room Starter Guide
Once the plant is cut, manufacturing begins in the dry room: segment the crown, hang material for uniform exposure, and follow a controlled drying schedule that brings flower and leaf to trim readiness together.
Read the Dry Room Starter Guide →