


Cannabis bucking is the step between drying and trimming, and a consistent procedure here makes every trim run faster and cleaner.
Best Manufacturing Practices for the Cannabis Industry · Softrim Starter Guide Series
Purpose of Cannabis Bucking
Bucking is the manufacturing step between drying and trimming. Its job is to remove flower from the dried branch cleanly and efficiently, preserve flower structure, minimize exposed stem, keep the moisture condition created in the dry room, and separate significantly different flower sizes before trimming. What happens here sets how efficiently trimming runs, whether by machine or by hand, and how much cleanup quality control must do later.
Manufacturing only works when variables are limited to repeatable processes. A consistent bucking procedure removes variables before trimming, and the more repeatable the process, the more stable the output.
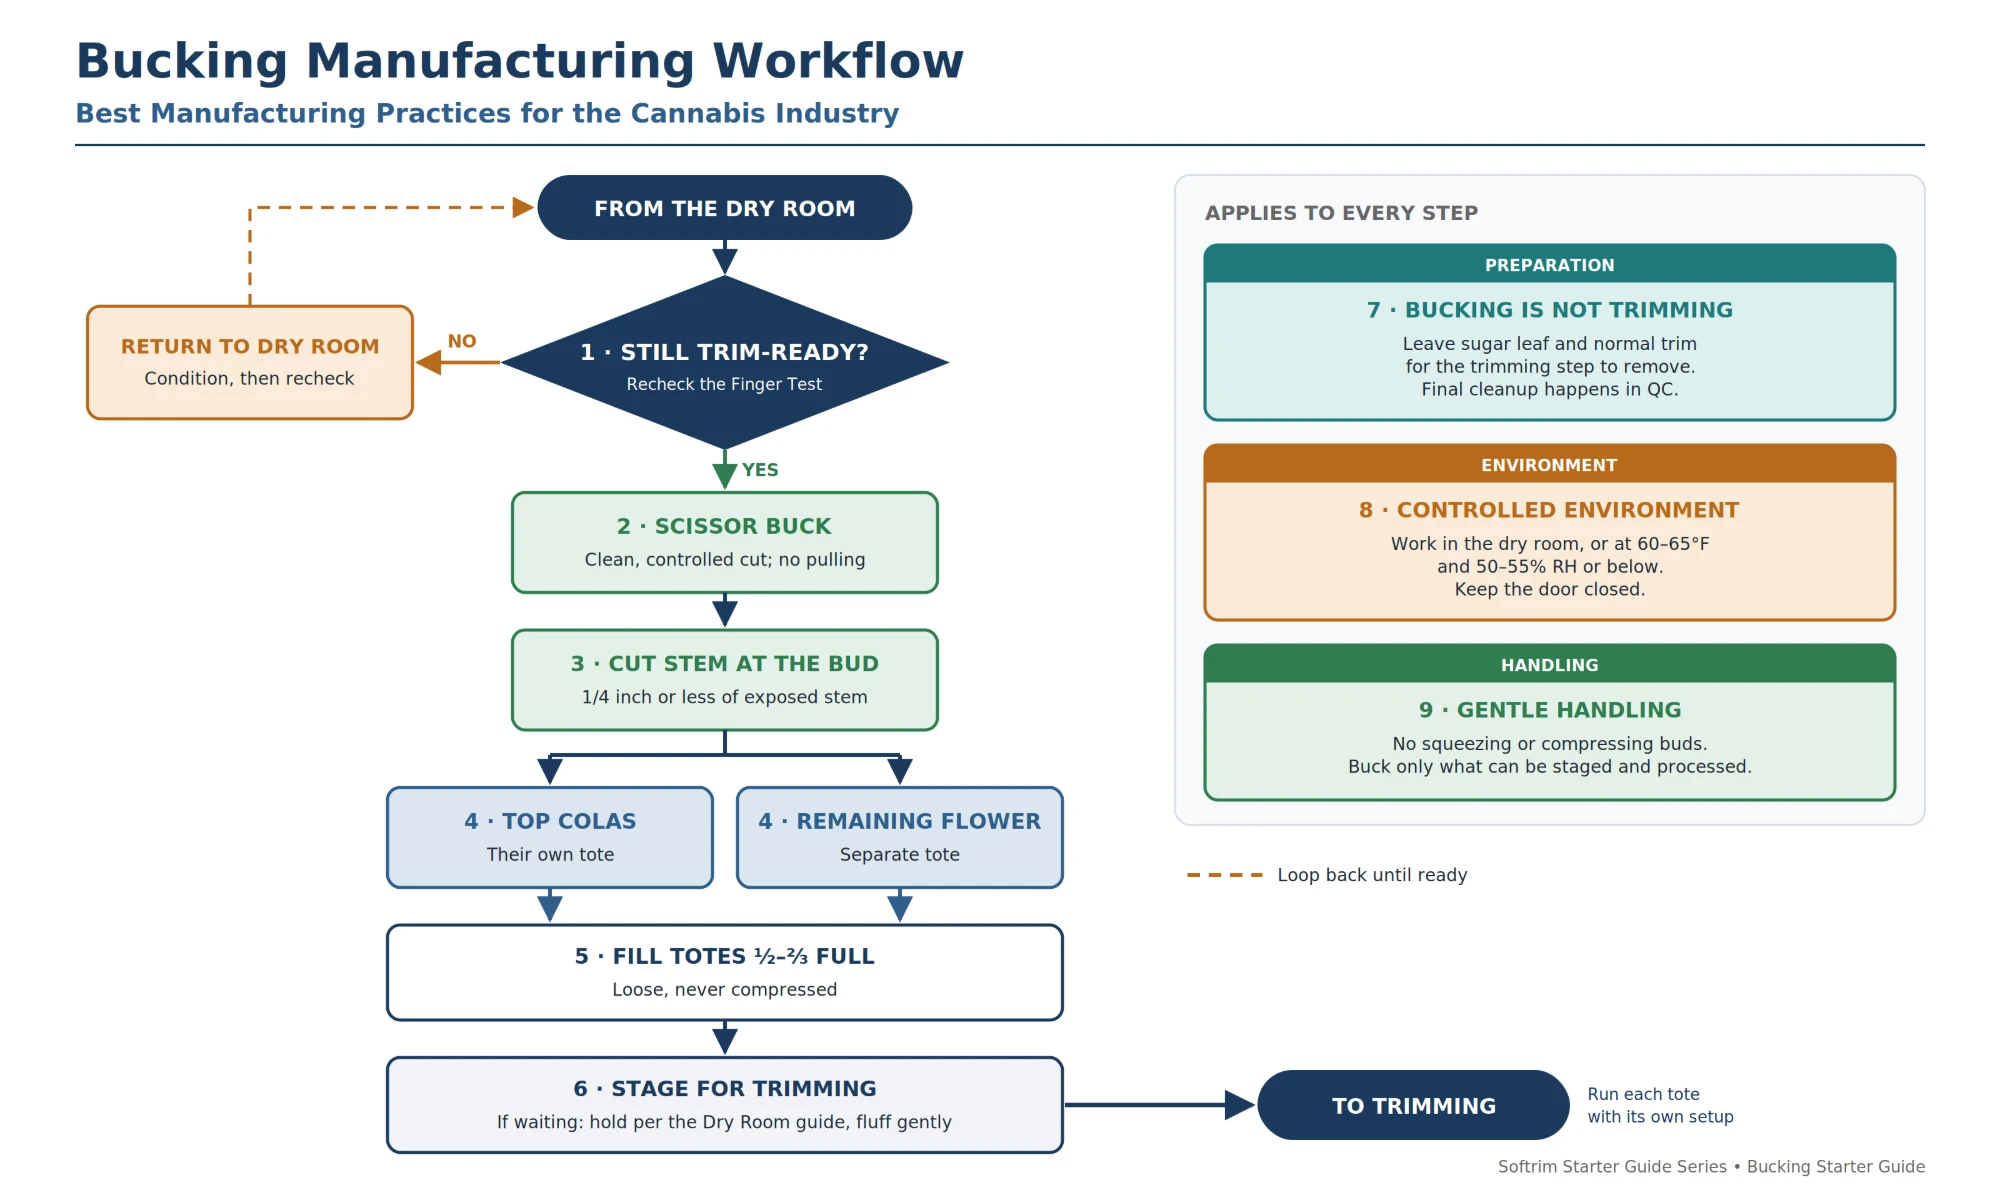
The diagram below shows the bucking workflow, and the rest of this guide walks through it step by step.
Quick Reference Guide
A road map of this guide, in the same order as the diagram. Review it before reading, then use it as a quick reference on the manufacturing floor. Click any topic to jump to that section.
| # | Topic | At a Glance |
|---|---|---|
| 1 | Confirm Trim-Ready | Recheck the Finger Test if material moved or waited. Not ready? Back to the dry room. |
| 2 | Scissor Buck | Clean, controlled cut at the base of the flower. No pulling, tearing, or stripping. |
| 3 | Cut the Stem at the Bud | 1/4 inch or less of exposed stem, without damaging the base of the bud. |
| 4 | Separate Top Colas | Top colas in one tote, remaining flower in another. Detailed grading waits for QC. |
| 5 | Fill Totes ½–⅔ Full | Loose, never compressed. |
| 6 | Stage for Trimming | Run each tote with its own setup. If waiting, hold per the Dry Room guide and fluff gently. |
| 7 | Preparation, Not Trimming | Leave sugar leaf and normal trim for the trimming step; cleanup happens in QC. |
| 8 | Controlled Environment | Dry room, or 60–65°F and 50–55% RH or below. Keep the door closed. |
| 9 | Gentle Handling | No squeezing or compressing. Buck only what can be staged and processed. |
The bucking formula: properly conditioned flower + clean stem removal + basic size separation + controlled environment = more efficient and consistent trimming.
Walking Through the Workflow
Each step below follows the diagram from the dry room to trimming.
1. Confirm the Flower Is Still Trim-Ready
Best practice: Before bucking, confirm the unwanted leaf is dry and brittle while the flower remains moist and structurally intact. If material has been moved, stored, or exposed to a different environment since the end of the dry, recheck the Finger Test (see the Dry Room Starter Guide). If it is not ready, return it to the dry room for conditioning.
Why it matters: Bucking material before the leaf is properly conditioned, or letting conditioned material regain moisture, reduces leaf brittleness before trimming. The objective is to carry the consistent dried condition created during drying directly through bucking and into trimming, the way each step on a manufacturing line hands a verified condition to the next.
2. Scissor Buck
Best practice: Scissor bucking is preferred when practical. Scissors make a clean, controlled cut close to the base of the flower without pulling, tearing, or stripping the bud from the branch. Hand bucking, pulling, shucking, or strip bucking are not preferred but can be used where appropriate; they may leave more exposed stem and put more mechanical stress on the flower.
Why it matters: A controlled cut is a repeatable cut, a basic requirement of any manufacturing operation. It preserves the natural structure of the bud, clips the stem closer to reduce cleanup after trimming, and sends more consistent material into the trimming process.
3. Cut the Stem at the Bud
Best practice: Clip the stem as close to the base of the flower as practical. Based on field observations, a useful starting standard is 1/4 inch of exposed stem or less.
Why it matters: Long stems left now are removed later in quality control. A short stem reduces post-trim scissor work, improves finished-flower consistency, keeps unnecessary stem out of trimming, and lets QC focus on presentation. A defined standard also gives every operator the same target, which is how manufacturing keeps output consistent across people and shifts.
Key principle: minimal exposed stem without compromising the integrity of the bud. The cut should not remove or damage the base of the flower.
4. Separate Top Colas From the Remaining Flower
Best practice: Put top / primary colas in one tote and remaining flower in a separate tote. Detailed product grades are not needed here; more specific sorting can happen in quality control.
Why it matters: Top colas differ from the remaining flower in size, density, structure, surface area, leaf coverage, and how they interact with the trimming equipment. In manufacturing terms, sorting inputs by size lets each run use one correct setup instead of a compromise. Because properly tuned trimming preserves the flower’s structure, the separation carries through to QC: larger colas are preserved, breakage drops, feeding is more consistent, and post-trim sorting and variation are reduced.
Key principle: perform preparation once, at the correct stage, rather than correcting preventable inconsistencies later.
5. Fill Totes ½ to ⅔ Full
Best practice: Fill totes 1/2 to 2/3 full maximum. Do not tightly pack or compress flower.
Why it matters: Headspace reduces compression and flower damage, keeps material loose and easy to redistribute, helps prevent localized moisture accumulation, and makes totes easier to manage. A standard fill level is one of the simplest repeatable controls in the manufacturing process.
6. Stage for Trimming
Before entering trimming, bucked flower should have:
- Dry, brittle leaves and moist, structurally intact flower.
- Approximately 1/4 inch or less of exposed stem and no unnecessary branch material.
- Top colas separated from the remaining flower.
- No obvious moisture pockets.
- Loose storage in the dry room or another controlled space.
- Normal unwanted leaf still in place for the trimming step to remove.
Run each tote with the setup suited to it. The goal is to present trimming with consistent flower that requires trimming, not additional preparation.
If material must wait: Follow the holding procedures in the Dry Room Starter Guide. Fluff and redistribute the material as needed to keep moisture consistent throughout the tote, but gently: lift, turn, or reposition it by hand rather than shaking, tumbling, or tossing the container. Do not buck significantly more material than can be reasonably staged and processed.
Supporting Practices
These apply to every step in the diagram.
7. Bucking Is Preparation, Not Final Trimming
Do not spend labor hand-trimming flower during bucking. Leave unwanted sugar leaf and normal trim material for the trimming step to remove. Final cleanup, such as remaining stem, crow’s feet, isolated leaf, larf separation, and finished-product sorting, belongs in quality control after trimming. Good manufacturing assigns each task to the stage where it can be completed most efficiently.
8. Keep Bucking, Staging & Trimming in a Controlled Environment
Best practice: Whenever practical, perform bucking, staging, holding, and trimming inside the dry room, keeping the whole manufacturing cell in one controlled environment. Otherwise, use a controlled processing area at 60–65°F or below and 50–55% RH or below, staying close to the conditions the material was conditioned in; lower RH may be preferable to preserve dry, brittle leaf. For stored material, follow the holding conditions in the Dry Room Starter Guide. Keep the dry-room door closed as much as practical.
Why it matters: Properly conditioned flower can change when exposed to warmer or more humid air, so a stable manufacturing environment is required to keep the material from changing. Leaf that was dry and brittle at the end of the dry absorbs moisture from the new environment and softens as it re-equalizes, reducing the physical difference between flower and leaf that efficient trimming relies on.
Maintain dry, brittle leaf + moist, structurally intact flower from the end of drying through completion of trimming.
9. Handle Flower Gently
Dried flower is more susceptible to mechanical damage than freshly harvested flower. In higher-volume manufacturing, flower must still move quickly; the goal is to avoid unnecessary damage, compression, or breakdown. Avoid squeezing or compressing buds, do not aggressively pull tightly attached flower from the branch (switch to scissors when hand bucking starts damaging flower), and avoid any handling that visibly breaks down or deforms the bud.
Bucking Checklist
| Do | Avoid |
|---|---|
|
|
Key Takeaway
Proper bucking preserves the work already completed during cultivation and drying while preparing the flower for efficient trimming. When trimming is properly tuned, the size and structure preserved here carry through the trimming process, reducing downstream sorting, stem cleanup, breakage, and manufacturing variability.
Properly conditioned flower + clean stem removal + basic size separation + controlled environment = more efficient and consistent trimming.
Next Step: Trimming Starter Guide
Once flower is bucked and staged, the next manufacturing step is to select the appropriate equipment setup, feed material consistently, evaluate trimming performance, and adjust for flower size, structure, moisture, and leaf condition.
Continue with the Softrim 1000 Trimming Starter Guide.