


A disciplined cannabis trimmer setup, from documented starting settings to one-change-at-a-time tuning, is what makes Softrim 1000 results repeatable.
Best Manufacturing Practices for the Cannabis Industry · Softrim Starter Guide Series
Purpose: Cannabis Trimmer Setup for the Softrim 1000
Trimming is the manufacturing step where unwanted leaf is removed. Successful Softrim 1000 processing depends on the relationship between moisture + flower structure + flower size + defoliation + machine setup.
Properly prepared flower should enter the Softrim 1000 as moist, structurally intact flower surrounded by dry, brittle unwanted leaf. The machine is then tuned to remove that leaf while preserving the flower’s existing size, shape, moisture, trichomes, and natural characteristics.
Manufacturing only works when variables are limited to repeatable processes. Consistent material from the dry room and bucking, documented starting settings, and one-change-at-a-time tuning make trim results repeatable, and the more repeatable the process, the more stable the output.
The diagram below shows the setup and tuning workflow, and the rest of this guide walks through it step by step.
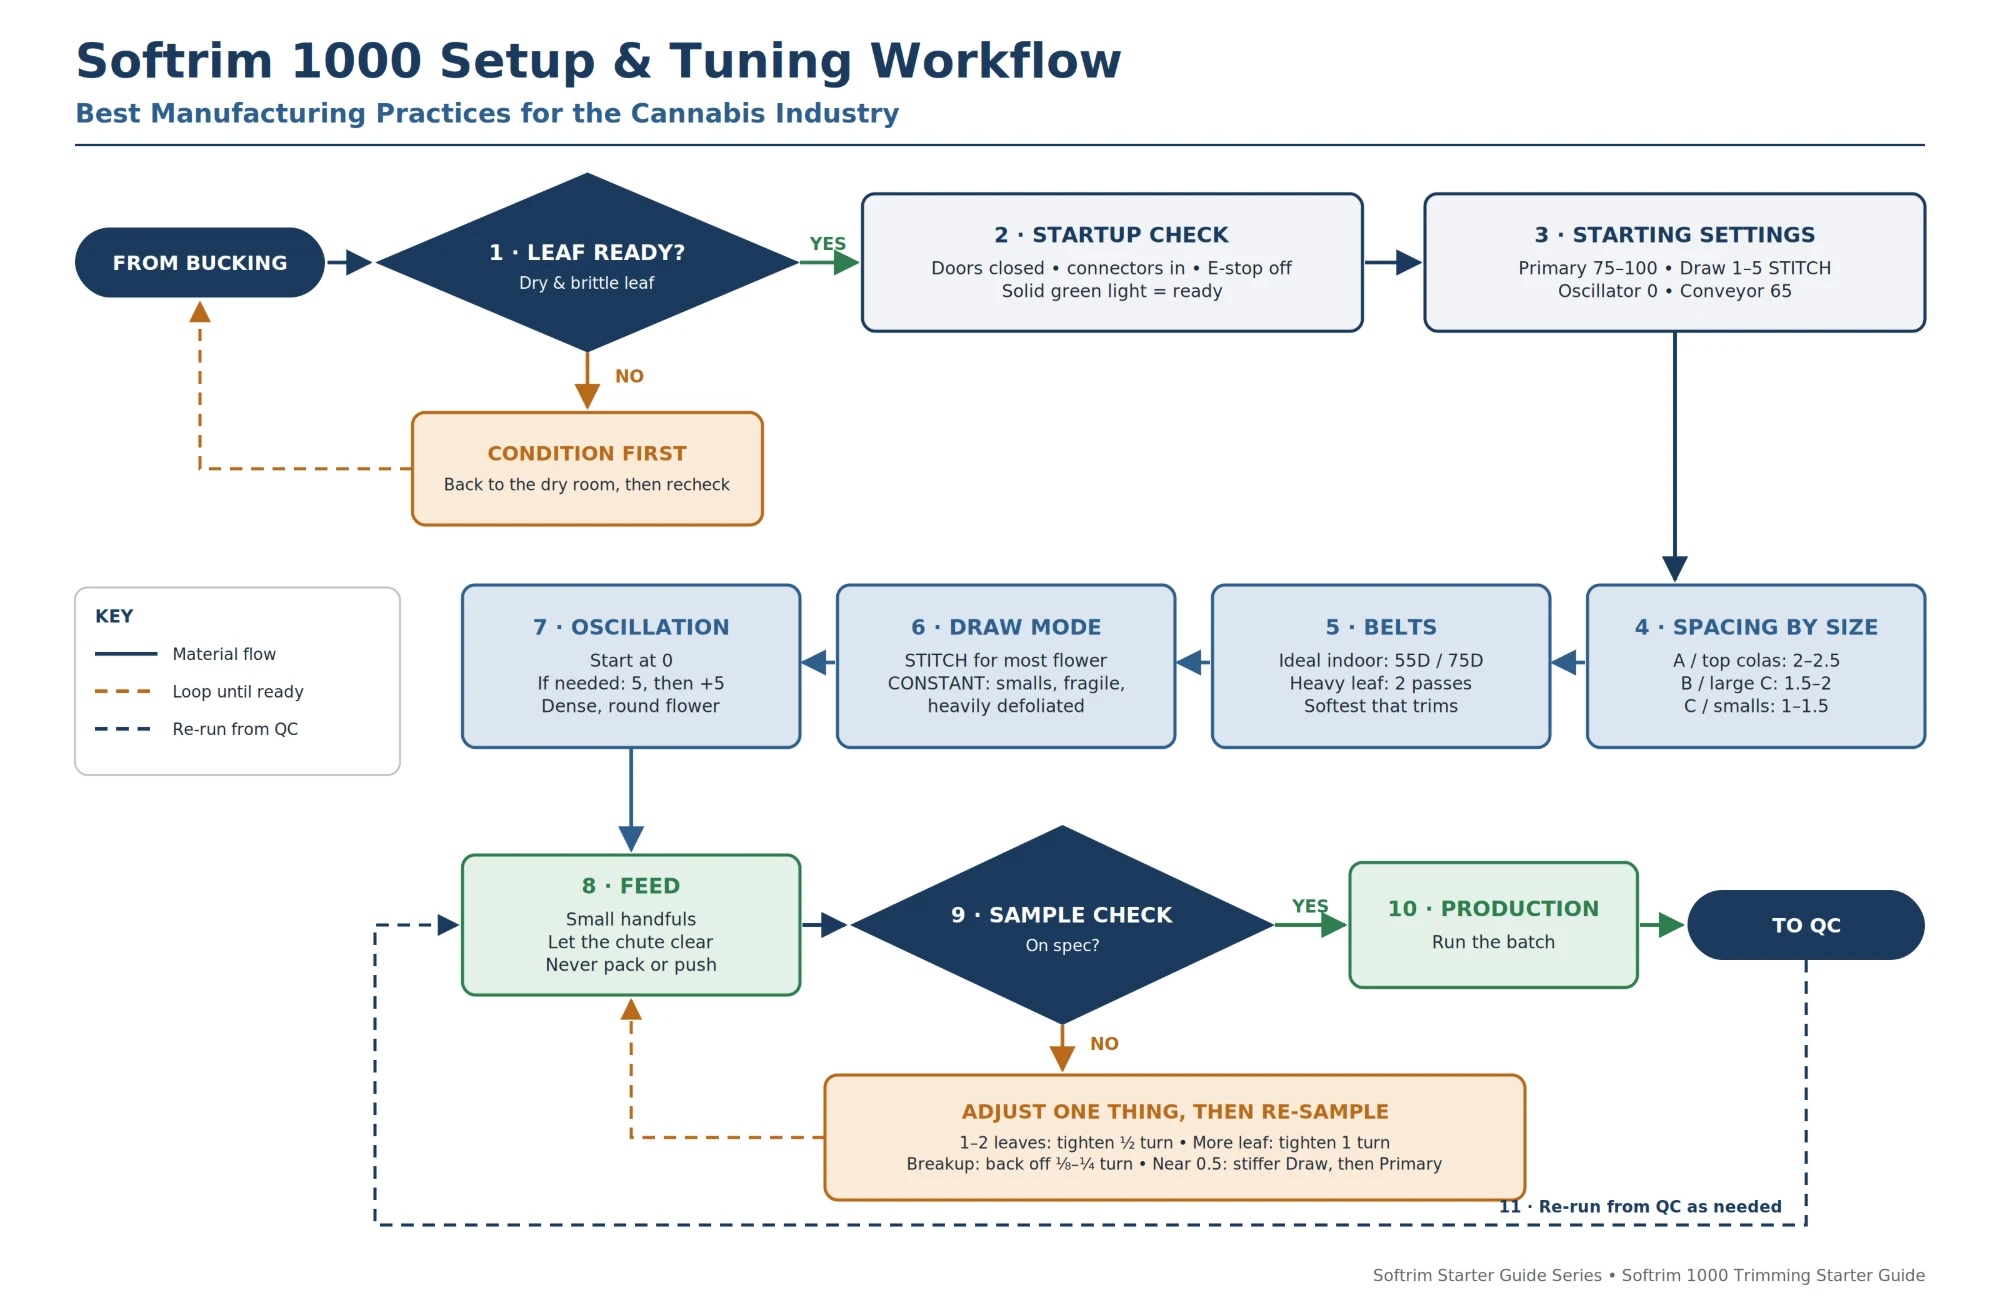
Quick Reference Guide
A road map of this guide, in the same order as the diagram. Review it before reading, then use it at the machine. Click any topic to jump to that section.
| # | Topic | At a Glance |
|---|---|---|
| 1 | Confirm Material Condition | Leaf must be dry and brittle. Pliable leaf: condition the flower, do not tune the machine. |
| 2 | Startup Check | Doors closed, connectors in, E-stop disengaged, solid green light. |
| 3 | Starting Settings | Primary 75–100 • Draw 1–5 STITCH (max 25) • Oscillator 0 • Conveyor 65. |
| 4 | Spacing by Flower Size | A / top colas 2–2.5 • B / large C 1.5–2 • C / smalls / micros 1–1.5. |
| 5 | Belt Selection | Ideal indoor 55D / 75D. Heavy leaf: 75D / 75D pass, then final trim. Softest that trims. |
| 6 | Draw Mode | STITCH for most flower. Consider CONSTANT for smalls, fragile, or heavily defoliated flower. |
| 7 | Oscillation | Start at 0. If needed, 5, then +5. Best for dense, round flower; cautious on loose flower. |
| 8 | Feeding | Small handfuls; let the chute clear. Never push or pack. |
| 9 | Sample, Check & Tune | 1–2 leaves: tighten ½ turn • More: 1 turn • Breakup: back off ⅛–¼ turn • Near 0.5: stiffer Draw, then Primary. |
| 10 | Production Run | Run the batch only after a sample is on spec. Output goes to QC. |
| 11 | Re-Processing | Re-run as many times as needed; let the flower’s response set the passes. |
| 12 | Throughput Reference | ~1,000 lb per 8-hour shift; ~20 seconds per lb of active processing. |
The Softrim 1000 formula: evaluate moisture + structure + size + defoliation, then set spacing + belts + draw mode + oscillation.
Walking Through the Workflow
Each step below follows the diagram from bucking to QC.
1. Confirm Material Condition
Before starting, and before ever making Softrim more aggressive, confirm the flower is properly conditioned. If the remaining unwanted leaf bends, folds, rolls, or stays soft or leathery, return it to the dry room for conditioning (see the Dry Room Starter Guide). Excessively wet material should be conditioned rather than compensated for with increasingly aggressive settings. If the leaf is already dry and brittle but the trim is below specification, then use machine adjustments: spacing, belts, Draw operation, and oscillation.
Key principle: condition the flower when the flower needs adjustment. Tune the machine when the machine needs adjustment.
2. Startup Check
Before processing, confirm the machine doors are closed, both cartridge connectors and the machine-to-HMI connectors are connected, the E-stop is disengaged, and the green indicator light is solid.
Table 1. Green Light Indicator
| Light | Meaning |
|---|---|
| Slow flash | Green button requires operator input |
| Fast flash | Fault condition |
| Solid green | Machine ready |
3. Recommended Starting Settings
Table 2. Starting Settings
| Adjustment | Recommended Starting Point |
|---|---|
| Primary belt speed | 75–100 |
| Draw belt | 1–5 on STITCH; do not exceed 25 |
| Oscillator | Start at 0; if needed, start at 5 and increase in increments of 5 |
| Vibratory conveyor | 65 default; do not exceed 65 |
These settings are a baseline. Final settings are determined by the actual flower and the finished trim result. Recording what works for each cultivar and flower category turns tuning into a repeatable manufacturing procedure.
4. Starting Spacing by Flower Size
Table 3. Starting Spacing
| Flower Category | Starting Spacing |
|---|---|
| A — Top Colas | 2–2.5 |
| B’s / Large C’s | 1.5–2 |
| C / Smalls / Micros | 1–1.5 |
Larger flower needs more room through the trimming area; smaller flower generally benefits from tighter spacing to stay engaged with the belts. Keep the size separation established during bucking whenever practical, because different flower sizes may need different settings.
Key principle: larger flower = wider spacing. Smaller flower = tighter spacing.
5. Belt Selection
The two belts have different jobs. The Primary (FAST MOVING) focuses on flower protection and controlled engagement; the Draw (SLOW MOVING) provides trimming aggression and leaf-removal force. Whenever practical, use a softer Primary and control most of the trimming aggression through the Draw. Belt durometers: 55D (pink) soft, 65D (blue) medium, 75D (orange) stiff. The preferred starting configuration for ideally prepared indoor flower is 55D Primary / 75D Draw.
Table 4. Quick Belt Selection
| Flower Condition | Primary (FAST MOVING) |
Draw (SLOW MOVING) |
|---|---|---|
| Ideal dry, general indoor | 55D | 75D |
| Large / dense | 55D | 75D |
| Large / loose | 55D | 75D → 65D if breakage appears |
| Smalls | 55D or 65D | 65D or 75D |
| Dry smalls + significant leaf | 65D | 75D |
| Near-finished / light cleanup | 55D | 65D |
| Slightly moist / resilient | 65D | 75D |
| Lowers | 65D | 75D |
| Poorly defoliated / heavy leaf | 65D or 75D | 75D |
| Very dry / fragile large flower | 55D | 65D |
| Excessively wet material | Condition first | Condition first |
Moisture rule: Slightly more moisture gives flower flexibility to flex and conform rather than break, which can allow stronger belt engagement, and more pliable leaf may also need stronger interaction to remove. Very dry flower is less flexible and carries greater breakage risk.
Poor defoliation and two-pass processing: When significant defoliation is required, run a defoliation pass at 75D Primary / 75D Draw to remove heavier exterior leaf, then a final trim at 55D or 65D Primary / 65D or 75D Draw, chosen by flower size, structure, moisture, remaining leaf, and how much trimming is still needed.
Key principle: use the softest configuration that produces the required trim while preserving the flower.
6. Draw Mode: STITCH vs. CONSTANT
STITCH (the normal starting mode, 1–5) runs the Draw belt in short, staggered movements. At 1 on STITCH, the belt moves about two inches every 2–3 seconds and stays relatively still in between, which increases trimming interaction and surface contact. Each movement also advances the belt; as the silicone fingers pass through the lower cartridge they spread apart and release captured leaf and waste. The result is a cycle of trimming interaction → belt advancement → waste release → trimming interaction.
CONSTANT keeps the Draw moving continuously, reducing prolonged stationary contact with the flower. That helps extremely dry or fragile flower avoid unnecessary breakdown, and reduces extra touches on heavily defoliated flower that needs less trimming.
Table 5. Draw Mode Starting Rule
| Flower | Draw Mode |
|---|---|
| General flower | STITCH |
| Smalls / micros | Consider CONSTANT |
| Extremely dry / fragile | Consider CONSTANT |
| Heavily defoliated / light trim requirement | Consider CONSTANT |
Key principle: STITCH maximizes trimming interaction while periodically advancing and clearing the Draw belt. CONSTANT keeps the Draw moving when less stationary interaction is desired. The Draw should not exceed 25.
7. Oscillation
The oscillator adds a horizontal, side-to-side scrubbing motion to the Draw belt, creating an additional plane of motion between the silicone fingers, flower, and remaining leaf. This can expose different areas of the flower, increase leaf movement and its range of motion, and improve interaction on certain flower structures. Begin at 0; if needed, start at 5 and increase in increments of 5, evaluating the flower after each change.
Table 6. When to Use Oscillation
| Flower Condition | Starting Logic | Why |
|---|---|---|
| General flower | 0 | No specific reason to add motion |
| Dense / tight / round (morphology like Wedding Cake or Gelato) | Consider 5, increase gradually | Scrubbing reaches more surfaces of compact flower |
| Slightly pliable leaf | Consider 5, evaluate | Leaf needs more range of motion; hydrated flower tolerates a little |
| Smalls needing significant cleanup | Consider 5, increase as needed | Adds leaf-removal interaction |
| Loose / open / fragile (morphology like GMO or White Truffle) | Prefer 0, use cautiously | Greater likelihood of breakdown |
| Excessively wet / soft leaf | Condition first | Machine settings cannot fix material condition |
Cultivar names are examples of flower morphology, not cultivar-specific required settings.
Key principle: oscillation adds a horizontal scrubbing motion and another plane of interaction. It is not simply an aggression setting.
8. Feeding the Softrim 1000
Feed the chute in small handfuls, let the material move down naturally, and add the next handful as the previous one begins to clear. Keep a steady supply and maintain size separation where practical. Do not force, push, or tightly pack flower down the chute.
Single-piece flow: The Softrim 1000 is designed to pull approximately one row of buds at a time into the trimming area, so each piece of flower receives more consistent treatment, the same principle behind single-piece flow in any manufacturing line.
Key principle: feed consistently and do not pack the chute. Let Softrim pull the flower through naturally.
9. Sample, Check & Tune
Once starting settings are in place, process a small amount of flower and evaluate how much cleanup would still be needed in QC. Make one adjustment at a time, then run another sample and reevaluate.
Table 7. Tuning From the Sample
| Sample Result | Adjustment |
|---|---|
| About 1–2 leaves remaining | Tighten spacing about ½ turn clockwise |
| More than 1–2 leaves remaining | Tighten spacing about 1 full turn clockwise |
| Trim is good, breakup appears | Back spacing off about ⅛–¼ turn; continue with small adjustments until trim and flower preservation balance |
| Spacing near 0.5, trim slightly short, breakup beginning | Stop tightening and increase belt stiffness: Draw first, then Primary if a 75D Draw is already installed |
When to increase belt stiffness: Spacing is the first fine-tuning tool, but past a point, tightening adds breakup without enough extra leaf removal. Near 0.5, increase Draw stiffness first, run another sample, and reevaluate; only if a 75D Draw is already installed and more engagement is needed, increase Primary stiffness. The 0.5 reference is a tuning rule of thumb, not a hard mechanical minimum.
Key principle: spacing first → Draw stiffness second → Primary stiffness last.
10. Production Run
Run the batch only after a sample meets specification. Keep feeding consistent and flower sizes separated, and send output to quality control. Repeated QC findings come back to Step 9 as tuning feedback (see the Quality Control Starter Guide).
11. Re-Processing Flower
Flower can be run through the Softrim 1000 as many times as necessary to reach the desired finished trim, with minimal to no damage to trichomes or overall bud characteristics when the flower is properly conditioned and the machine is properly tuned. Let the remaining leaf, the finished-product requirement, the material condition, and how the flower is responding set the number of passes, not a predetermined maximum.
Key principle: process as many times as necessary to achieve the desired trim while preserving the natural characteristics of the flower.
Supporting Practices
12. Throughput Reference
The Softrim 1000 processes approximately 1,000 lb per 8-hour shift. A useful active-processing reference is approximately 20 seconds per pound. Treat the two separately: total shift throughput also includes loading, sorting, tuning, QC, handling, and the normal production workflow.
Softrim 1000 Checklist
| Do | Avoid |
|---|---|
|
|
Key Takeaway
Successful Softrim 1000 processing begins by evaluating moisture + structure + size + defoliation, then setting the appropriate spacing + belt configuration + Draw mode + oscillation, sampling, and tuning one change at a time.
The objective: remove unwanted leaf while preserving flower size, structure, moisture, trichomes, and overall product quality.
Next Step: Quality Control Starter Guide
Trimmed flower moves to quality control, where the Picker routes each bud to pass-through, stem work, re-run, or larf conditioning, and repeated findings feed back into Softrim tuning.
Read the Quality Control Starter Guide →